Reconnect 2025 - Extending FileMaker with React Native

This post is adapted from my presentation at FileMaker Reconnect in Melbourne, where I explored how React Native can extend FileMaker solutions to iOS, Android, and beyond.
If you’re a FileMaker developer who’s ever had a client ask for an Android app, or wondered how to deliver native mobile features beyond what FileMaker Go can provide, this post is for you.
I’ll show you that the leap from FileMaker layouts to React Native isn’t as daunting as it might seem—you already know more about native development than you might think.
Watch the video
FileMaker and mobile apps
FileMaker Pro handles most small business needs brilliantly. Its superpowers include rapid application development, enabling teams to adapt swiftly as business needs evolve. It brings a lot to the table - a relational database, powerful calculations and scripting, drag-and-drop layout and report builder, security, fantastic new AI features… for businesses looking for a platform to power their workplace OS, there’s nothing better.
But sometimes, clients need capabilities that FileMaker simply can’t deliver.
And while over the last decade FileMaker developers have rebranded their solutions from “databases” to “apps” - sometimes our clients really do need a native app.
Sometimes our users really do need the app to work on Android (FileMaker Go and the Mobile SDK are iOS only).
And sometimes they need features or performance that only native development can provide.
And that’s okay.

We can do both!
We don’t have to choose between Claris and native development. We can have both.
We can keep all the incredible benefits of the Claris ecosystem, and extend our reach with complementary platforms.
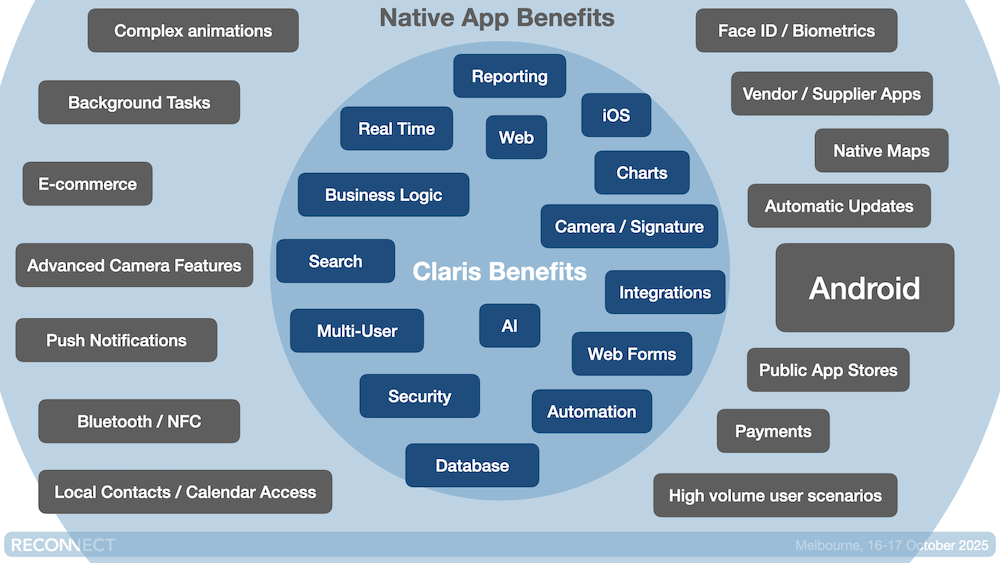
Today, I want to introduce you to one of those complementary platforms: React Native.
My goal is to give you some insight into what React Native is, show you why it might be your secret weapon for expanding your toolkit, and maybe give you a little confidence to try it out yourself.
React Native
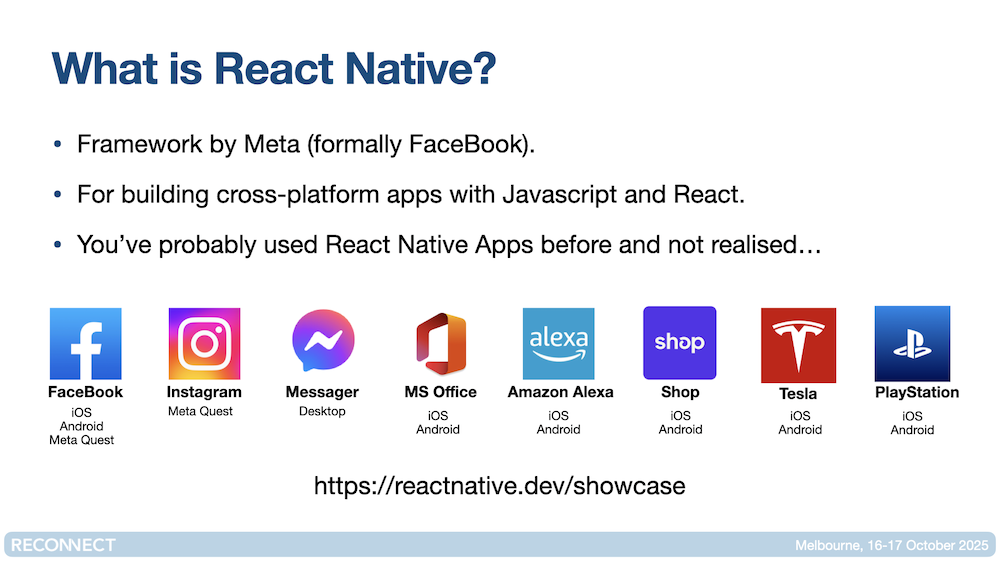
React Native is a framework developed by Meta, which enables you to write apps in JavaScript that deploy across many platforms, including Android devices, iOS (iPhone and iPad), Apple TV, Android TV, Apple Vision Pro and the Meta Quest.
You can also publish React Native to create native Mac and Windows apps.
You’ve likely used React Native apps and not realised it. Popular Apps include:
- FaceBook (iOS, Android and Meta Quest)
- Instagram (Meta Quest)
- Messanger (Desktop)
- Microsoft Office (iOS and Android)
- Shop (iOS and Android)
- Tesla (iOS and Android)
- Playstation (iOS and Android)
You can find more examples at https://reactnative.dev/showcase.
So we can see that real companies are building popular, multi-platform apps with React Native. But how would someone who’s only ever built in FileMaker get started?
FileMaker Layouts
Lets start with a simple example, taking a layout built in FileMaker, and converting this to a View in a React Native app.
First, I’ll need to explain some concepts about React, and how this maps to what you likely already know about builing in FileMaker.
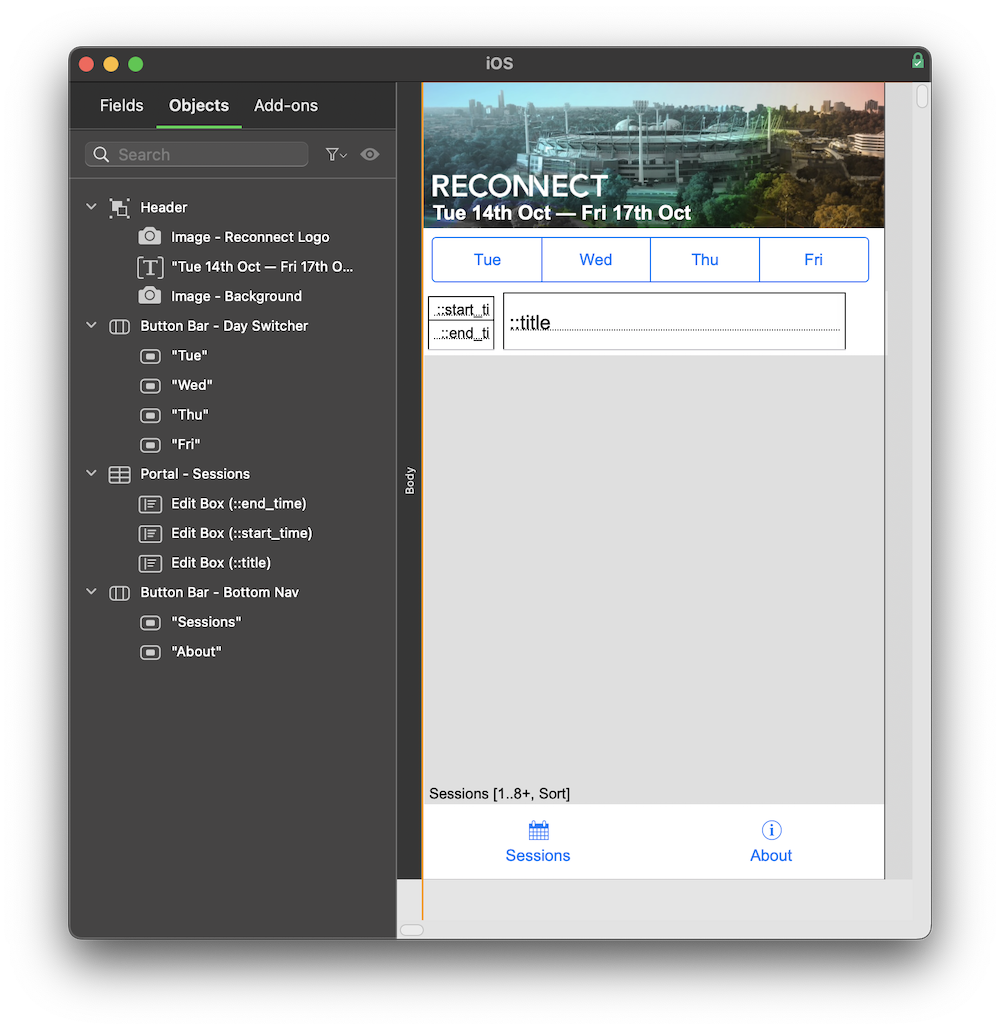
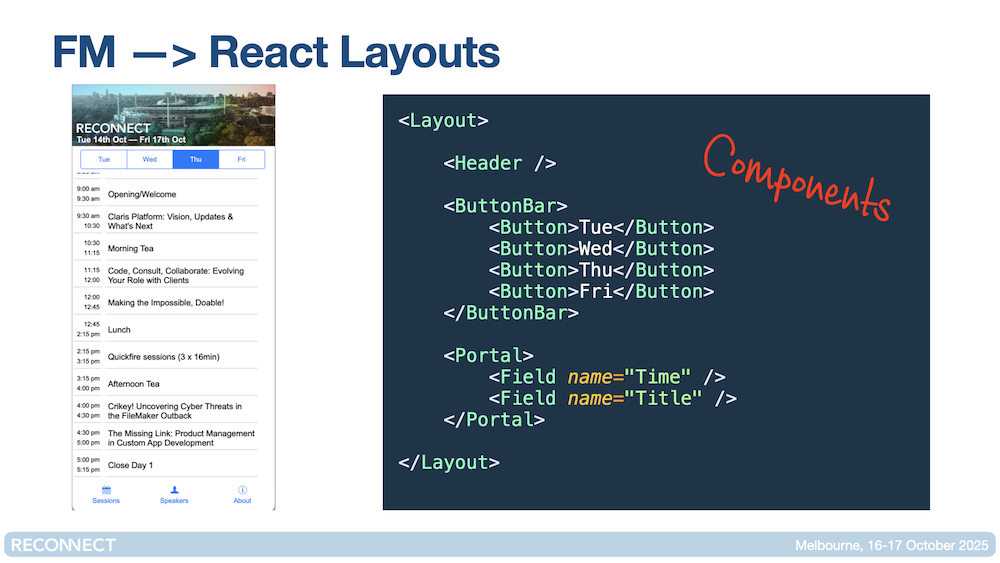
The screenshot above shows a FileMaker layout for a conference app. It features:
- An image, logo and text box with the dates of the conference, all grouped with the name Header.
- A Button Bar, with Buttons for each day of the conference. This is used to filter the list of sessions by the selected day.
- A Portal, that shows the conference sessions, which contains fields for start and end times, and the session name.
- A Button Bar for our app navigation.
For attendees at this conference, this is fairly basic FileMaker layout stuff. FileMaker’s drag an drop layout tools make this straightforward to build. React Native does not have an interface builder like this, we need to write code.
When you create a layout in FileMaker, under the hood it’s all described in XML. You can see this yourself: open any FileMaker layout, go to Tools > Save a Copy as XML, and you’ll see how FileMaker describes your layout with elements like Layout, ButtonBar, Text, and Portal.
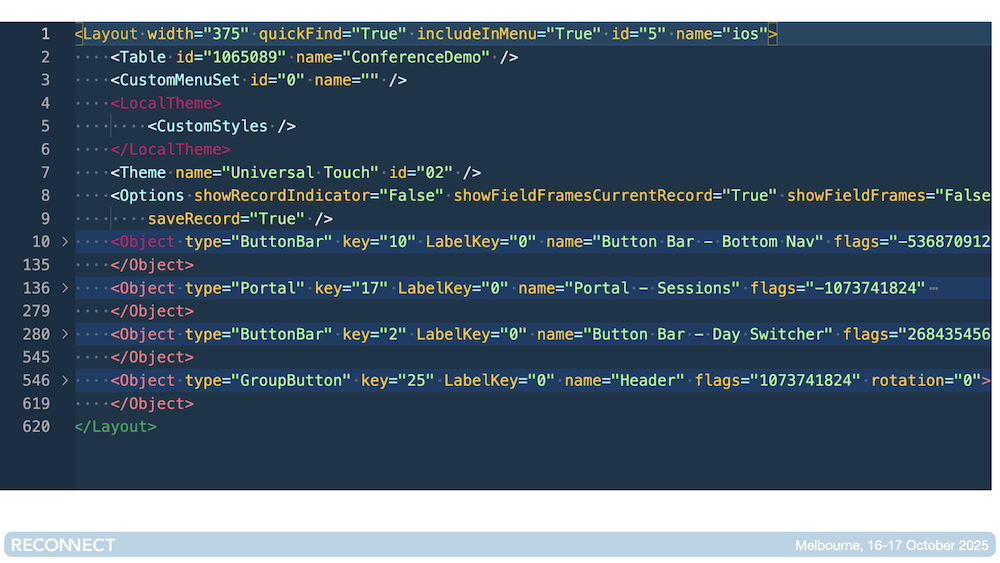
So if you have an understanding of how FileMaker structures it’s layouts, then you can apply this to learning React. Because while FileMaker describes the layout using XML, React and React Native Apps describe their interfaces in a very similar syntax called JSX — Javascript XML.

JSX combines XML-style markup with JavaScript. It’s a fantastic format for describing user interfaces — and if you’ve designed FileMaker layouts, the concepts will feel familiar.
FileMaker Layouts to JSX
Let’s look at how we’d write this same layout in JSX
First, here’s how we could structure out components. We have a parent object called Layout, with the three children Header, ButtonBar and Portal. In JSX, we’d call these objects Components.
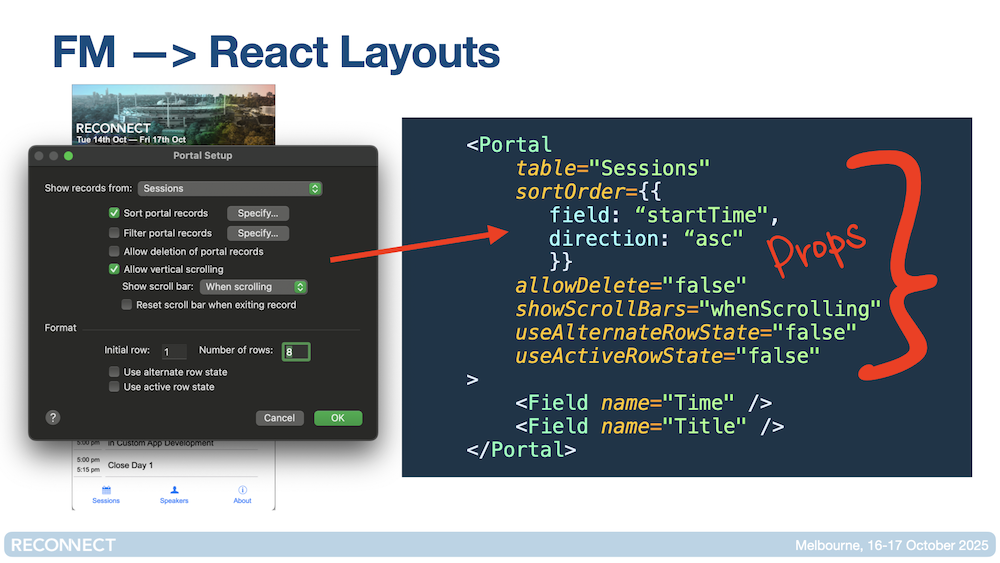
Of course, things like Button Bars and Portals have options. You can pass in options to components with props. Here’s an example of a Portal component, with props matching the options FileMaker provides.
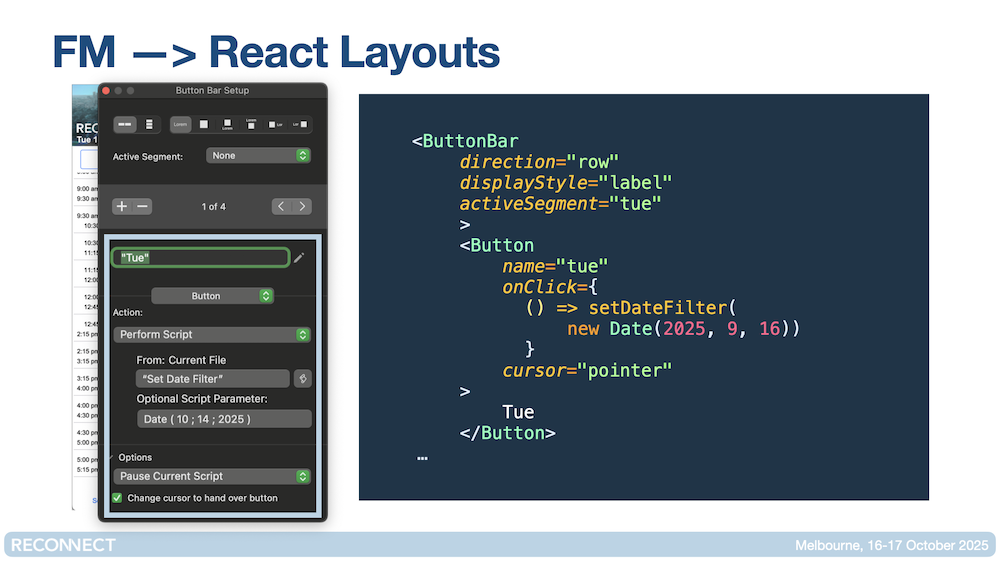
And remember how JSX stands for Javascript XML? Here’s an example of some JavaScript mixed in with our props, replicating what we can do by assigning a button action to Perform Script.
So React allows you to describe your user interface, in a very similar way to what FileMaker developers already do. Let’s run some code in React Native to get our conference layout running.
const HomeScreen = () => {

  ...
  //I'm keeping this focused on the layout concepts, so this code is simplified...

    return (
    <ThemedView style={styles.container}>
      <Header />
      <ButtonBar
        options={
          dateLabels.length > 0 ? dateLabels : ["Tue", "Wed", "Thu", "Fri"]
        }
        selectedIndex={selectedIndex}
        onSelectionChange={handleSelectionChange}
      />
      <Portal
        table={filteredSessions}
        keyField="filemaker_id"
        renderItem={renderSessionItem}
        showScrollBars="whenScrolling"
        useAlternateRowState={true}
        useActiveRowState={false}
        allowDelete={true}
        contentContainerStyle={styles.listContent}
      />
    </ThemedView>
  );
};
...
This React Native component recreates our FileMaker layout with:
- A Header component that is reusable across all our different screens in the app.
- A ButtonBar using that gets the days based on the returned data from our API, with fallbacks to hard coded day names.
- A Portal with familiar options we know from FileMaker Note: This post is focused on layout concepts for FileMaker developers understanding React Native layout concepts, so I’ve omitted some of the code to retain that focus. If you’re keen to hear about API integration, data filtering, and offline storage, let me know.
The beauty of React Native is that this exact code will run on multiple platforms. Let’s see that working:
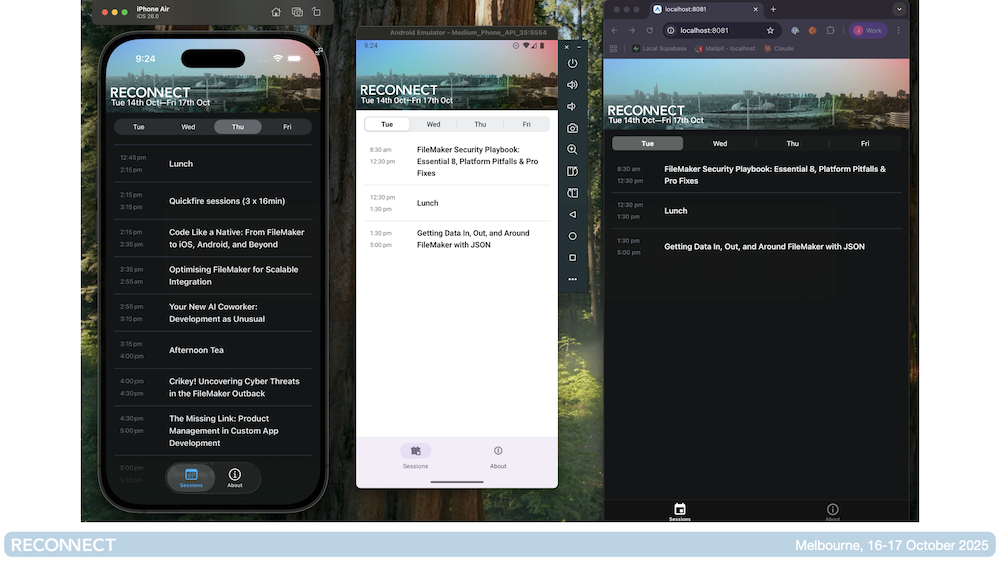
The screenshots don’t really do it justice. Check out the video here, which will play at the point I demo the app.
One thing worth pointing out is how each of these apps (using the same code) looks slightly different on each platform. All of them look great, but they take on styling cues from the platform that make them “feel right” on each. I’ll discuss this more shortly.
What magic is this?
So what’s really happening here? Does React Native know all about FileMaker elements and props and it just magically works on all the platforms?
That would be amazing. But no, that’s not how it works.
For the purposes of this talk – explaining to FileMaker devs how React works – I’ve “composed” various components that are “wrappers” around existing React Native components. This allows me to add my own custom names (like “Portal”), props (like “useActiveRowState”) and functionality (like swipe to delete) around existing React Native components.
This creates a helpful bridge between the language and conepts in FileMaker to react Native code. The conceptual leap from FileMaker layout design to React Native isn’t as big as you might think.
Also, it’s a useful metaphor for explaining what React Native does for us under the hood to allow the same code to work across many platforms.
What makes React Native, Native?
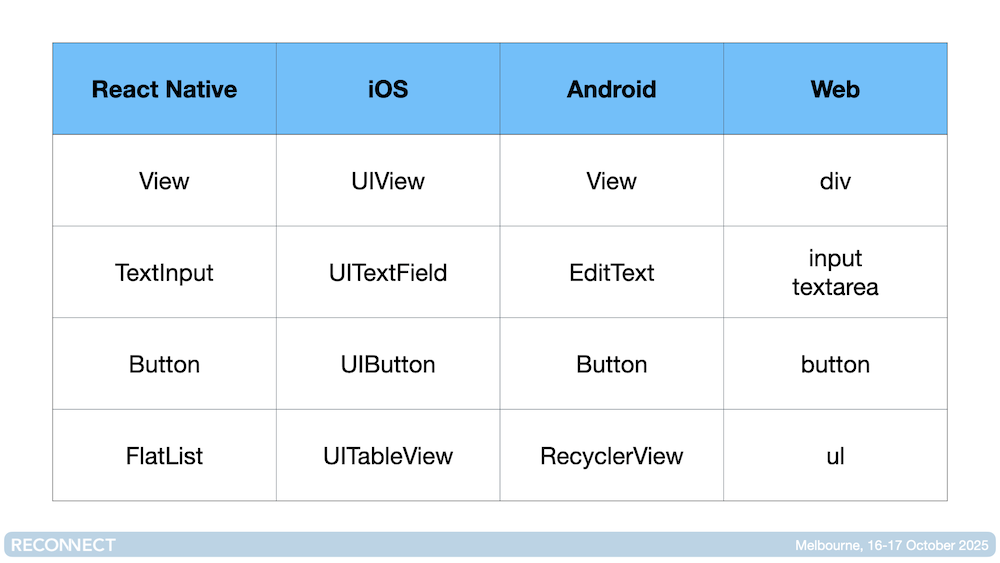
React Native isn’t like many cross-platform frameworks that try to fake native apps. It uses real native UI components under the hood.
When you use a React Native TextInput component, the compiler builds:
- UITextField on iOS—the same UI element you’d use in Swift
- EditText on Android—the same component you’d use in Kotlin
- Input on the web—the same you’d write in HTML
Exciting New Possibilities
FileMaker remains the best tool for rapid development of internal business applications. But when your clients need to reach users on Android, when they need offline-first mobile apps with advanced features, or when they need the polish and performance of a true native experience, React Native gives us options.
We can leverage the FileMaker Data API to power these native apps. You keep your business logic, your data management, your workflows in FileMaker—where they’re most effective—and extend your reach to whatever platforms your clients need.
We don’t have to choose between Claris and native development. We can have both.
Want to Explore This Further?
Here’s some links where you can learn more about React Native:
- ReactNative.dev — Official Website and docs
- Expo.dev — Recommended framework for iOS, Android and web.
Whether you’re a FileMaker developer curious about expanding your toolkit, looking for a partner to help with a native mobile project, or a business owner wondering how to extend your FileMaker solution to more users—I’d love to chat.
If you’d like a walkthrough of a full project or want to discuss how this approach could work for your business, reach out.